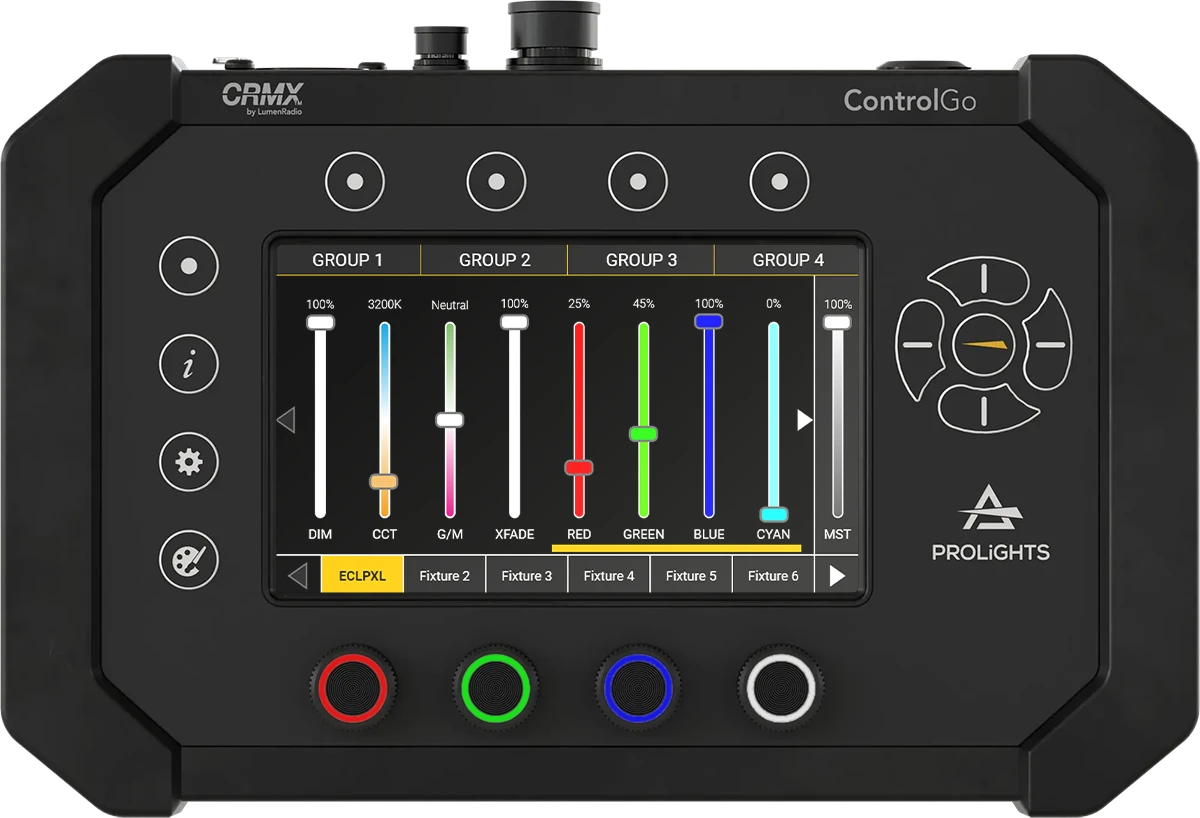
Fixture Control Overview
The Fixture Control section of ControlGo provides an easy way to manage connected lighting fixtures. This section uses buttons and a touchscreen to facilitate control. Below is an overview of the buttons and their functions.

Button Overview
Left Side of the Screen
-
Back/Esc Button: Returns to the home screen, allowing for a straightforward exit from any menu or operation.
-
Info Button: Opens or closes the DMX Output View, which provides detailed information about current DMX signals, including channel values and output status.
-
Gear Button:
- When a fixture is selected, this button opens the Patch Screen to set up the fixture.
- When a group of fixtures is selected, it opens the Group Edit screen to adjust settings for the entire group.
- Holding this button for 3 seconds resets and clears the current fader levels, ensuring a fresh start.
-
Show Tools Button: Opens the Snapshots and Sequences View. This feature is useful for managing show tools such as presets and sequences, which assist in setting up scenes and playback.
Top of the Screen
- Group Button: Selects a group of fixtures and triggers on-screen buttons directly below it. This function facilitates the management of multiple fixtures simultaneously, which is beneficial during large events.
Right Side of the Screen
-
Up Arrow Button: Switches between the Fixture Control View and the Group Master View, allowing for the management of individual fixtures or entire groups.
-
& Left & Right Arrow Buttons: Move between different channels on the selected fixture. Selected channels are indicated with a yellow line beneath them, and touching the screen will automatically connect to that channel, simplifying navigation.
Push Encoders
- Functionality: The push encoders are linked to four faders, controlling either the first four or the next four groups of channels. This setup facilitates the management of different sets of channels.
- Channel Identification: A yellow line beneath the fader indicates which channels are connected, providing a clear visual reference.
- Encoder Push: Pressing the encoder flashes the dimmer channels, which helps to test light output and verify functionality.
- Backlighting: The encoders are backlit to indicate their active status, providing a quick visual cue regarding which controls are engaged.
Touchscreen Overview
The Fixture Control screen is divided into sections to help manage fixtures effectively:
-
Top Section: Displays the four available groups. Groups can be selected using the touchscreen or by pressing the physical button for fast access.
-
Bottom Section: Shows fixture slots where up to 42 fixtures can be added. On-screen arrows can be used to scroll through the slots.
-
Central Section: When a fixture or group is selected, this section displays the faders for the channels of the selected fixture or group, allowing for detailed real-time adjustments during programming or live shows.
Loading Fixtures
Before using the Fixture Control features, ensure that all fixtures are loaded into the system. To add more fixtures, refer to the Library Management Guide for detailed instructions on importing and configuring fixtures.
For optimal results, ensure that fixtures are patched correctly before making adjustments. Proper patching guarantees that all fixture settings can be accessed and managed efficiently from the Fixture Control screen.
Grouping fixtures with similar settings simplifies control, particularly during live performances. Use the Group Button to effectively manage and adjust fixture groups.