DMX Recorder
The DMX Recorder feature in ControlGo lets you capture DMX signals so you can play them back later. This is really helpful for pre-programming lighting scenes that you want to reuse, like in live shows or events. It saves you a lot of time because you don’t have to set everything up from scratch every time. Since ControlGo only has a 5-pin DMX output, you’ll need a male-to-male adapter (not included) to connect the DMX signal for recording.

With the DMX Recorder, you can save different lighting setups and switch between them whenever you need to. This makes it great for events where you need different lighting scenes for different moments, and you want to be able to switch between them quickly.
Button Overview
- Back/Exit Button: This button is on the left side of the screen. It lets you exit the DMX Recorder function and go back to the previous screen.
- Info Button: This button opens and closes a help screen with instructions on how to use the DMX Recorder.
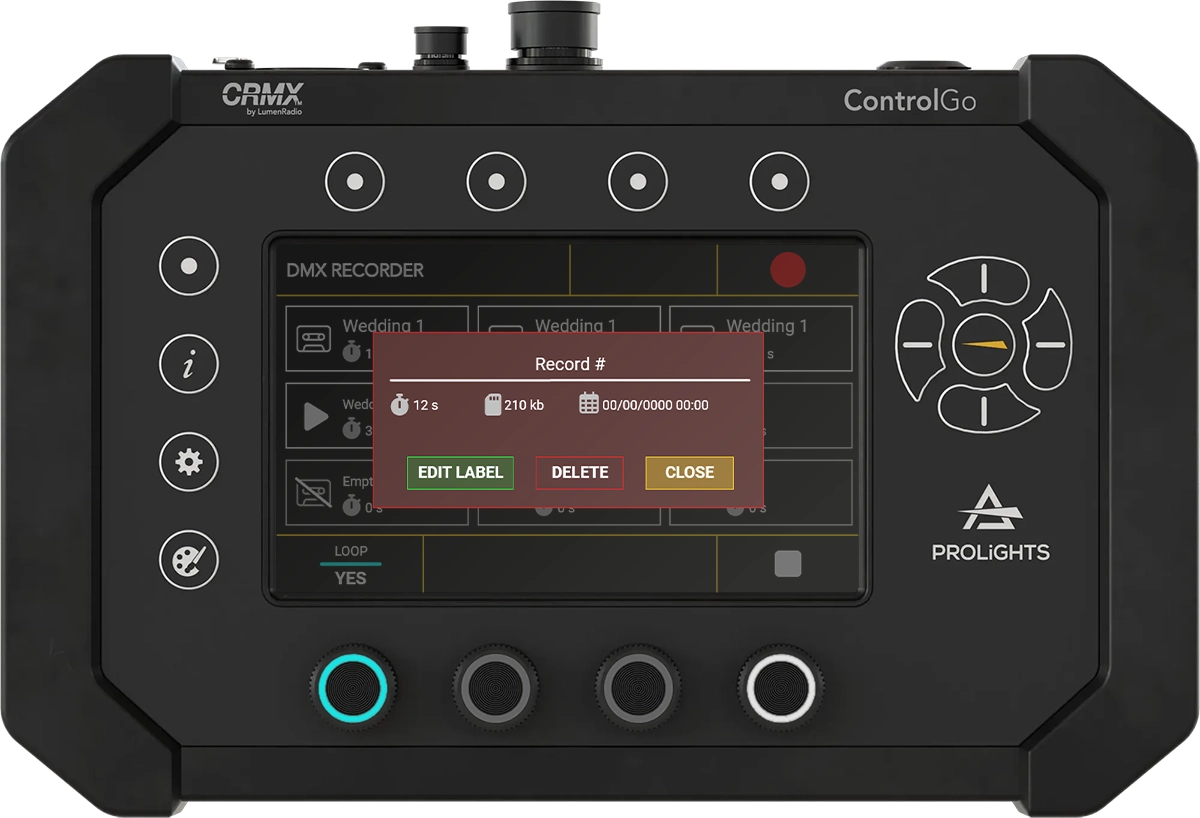
- Gear Button: When you select a slot, pressing this button opens a popup where you can change the name of the recording, delete it, or view more information.
- & Arrow Buttons: These are on the right side of the screen, but they are disabled in this mode. All the main features can be accessed through the touch screen or other buttons.
- Group Button (number 4): This button is used to start or stop recording. It’s the main button for capturing DMX signals when you need to.
Encoders Overview
ControlGo uses encoders to make playback easier. You can use them to adjust settings and change modes quickly.
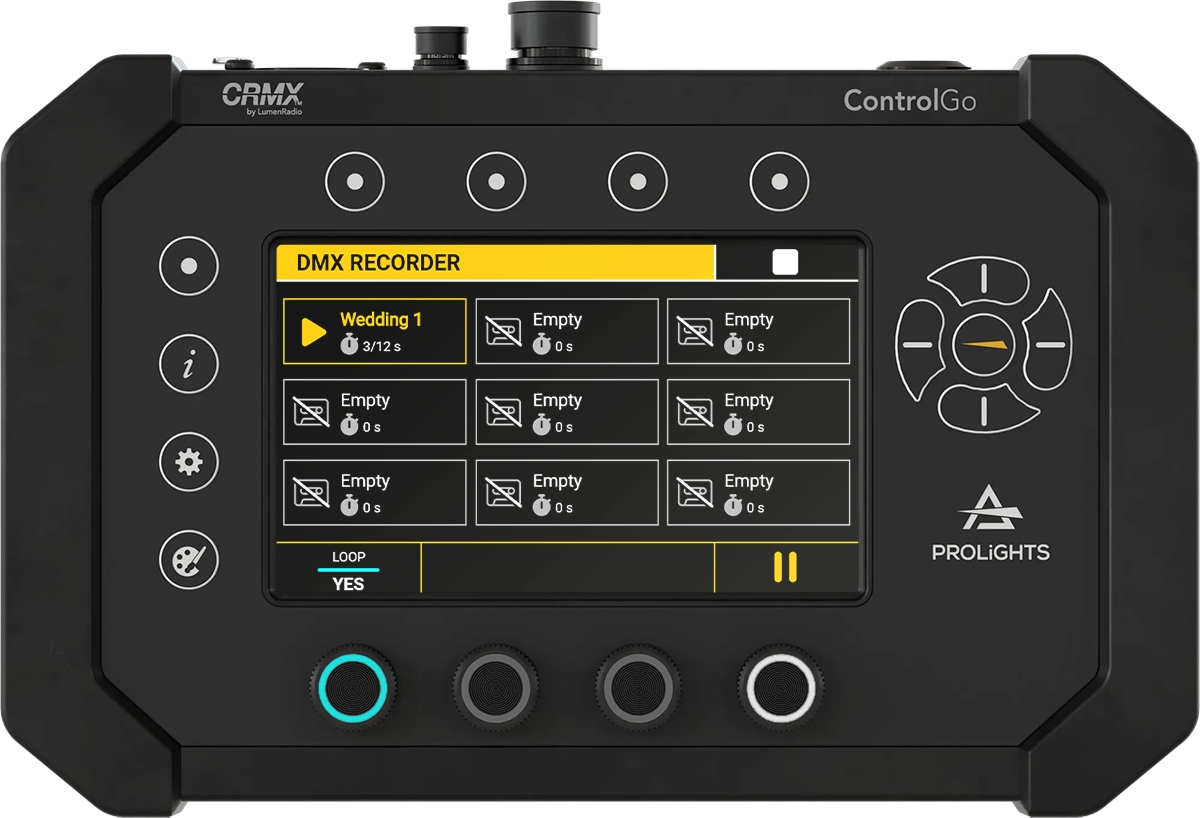
- Encoder 1 (Light Blue Backlight): This encoder switches between loop and stop modes during playback. If you choose loop mode, the recording will play over and over again, which is perfect for events that need a repeating lighting sequence. In stop mode, it will only play once and then stop.
- Encoder 4 (White Backlight): This encoder plays or pauses the selected slot. It’s handy if you need to pause a scene to make some changes or if you want to stop and start playback as needed.
Screen Overview
The DMX Recorder screen has nine slots where you can store recordings. Each slot can hold a different DMX scene, which makes it easy to keep your scenes organized and ready for different parts of your event:
![]()
- Slots with a cut cassette icon are empty and are labeled "Empty." These slots are available for new recordings.
- Slots with a yellow cassette icon mean that they already have a recording. This makes it easy to see which slots have saved scenes and which ones are empty.
How to Record
If you want to record a DMX signal, follow these steps:
- Connect the DMX Signal: Use a male-to-male adapter to connect a DMX signal to ControlGo. This step makes sure the DMX signal gets properly routed into the system so you can record it.
- Select an Empty Slot: Pick a slot that shows the cut cassette icon. This will make sure your new recording doesn’t overwrite anything you’ve already saved.
- Start Sending DMX Signal and Press the 4th Group Button: Ensure that the DMX signal is being actively sent from the source. Then, press the 4th Group Button to start recording. A red circle (the record icon) will appear, showing that the recording has started. If you haven’t picked an empty slot, the icon will stay gray, meaning recording can’t start.
- Monitor Recording: While recording, you’ll see the elapsed time, and the record icon will turn red. This way, you know the recording is in progress.
- Stop Recording: Press the 4th Group Button again (either on the screen or physically) to stop the recording. This will save the DMX data to the slot you selected.
How to Play
To play back a recording, follow these steps:
- Select a Recorded Slot: Pick a slot that has a recording (you’ll see a yellow cassette icon). This ensures you are selecting a valid recording.
- Press Encoder 4: Pressing Encoder 4 (the one with the white backlight) will start playback. While it’s playing, you can press it again to pause if needed.
- Stop Playback: To stop playback, press the stop button using the 4th Group Button. This will halt the playback, letting you decide when to move to the next step.
How to Edit a Recording
Editing a recorded slot is simple, and it helps you keep your recordings organized:
-
Open the Editing Popup: Hold down on a slot for 2 seconds on the touchscreen, or select the slot and press the Gear Button. This will open the editing options for that recording.

-
Edit Options:
- Edit Label: Choose this option to rename the recording. Giving each recording a name makes it easier to find the right one during live shows.
- Delete: This option removes the recording from the slot, freeing up space for new recordings.
- Close: If you don’t want to make any changes, select "Close" to exit the popup. This is helpful if you opened it by mistake or changed your mind.
By following these steps, the DMX Recorder function helps you capture, save, and play back DMX signals effectively. This feature is great for pre-programming lighting scenes and makes it much easier to manage complex shows. You can use the ability to record, play, and edit DMX data to prepare for events and make sure everything runs smoothly without having to redo all the lighting work every time.