Fixture Control - Sequences
The Sequences feature in ControlGo allows users to create and manage lighting sequences, which are made up of steps that correspond to the snapshots available in the Snapshots section. Each sequence can be used to create complex lighting changes over time by chaining together multiple snapshots with adjustable parameters for each step.

Sequence Overview
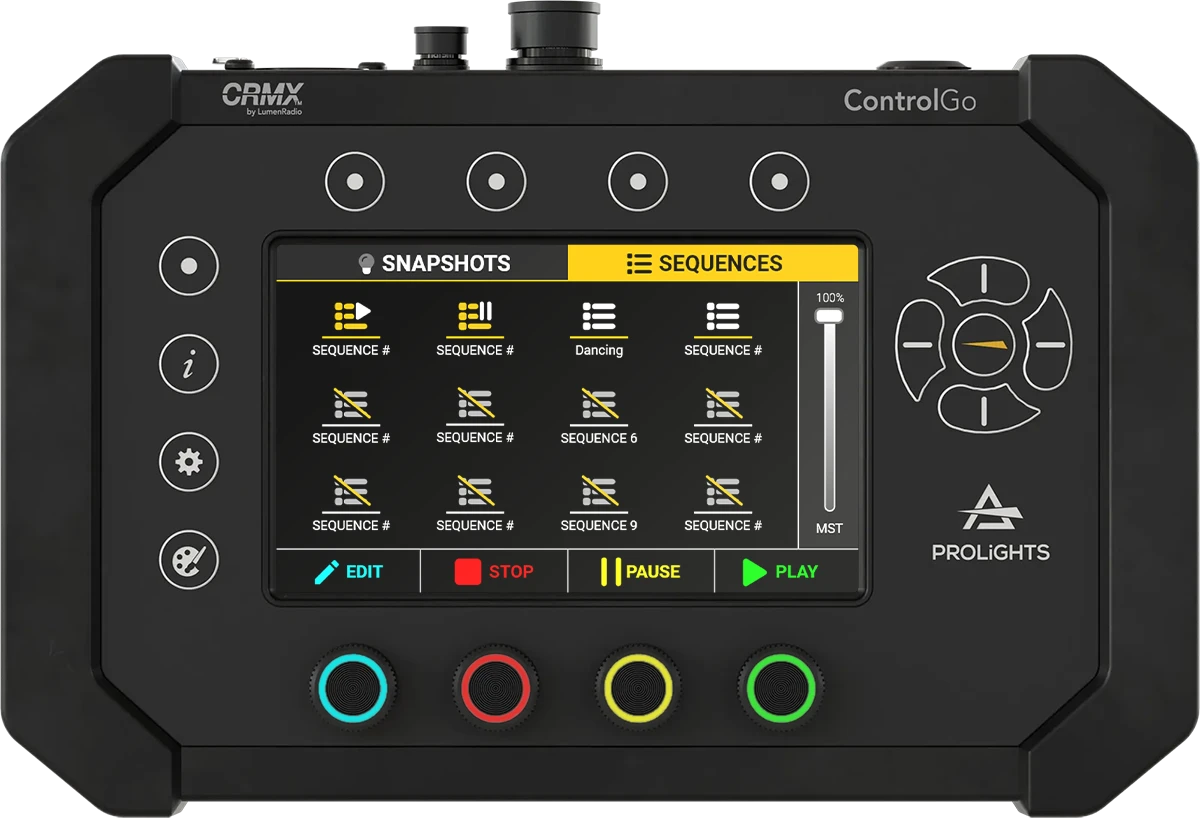
The Sequences screen provides a visual overview of all available sequences. Users can see which sequences are saved, as well as any empty slots available for new sequences.
Editing a Sequence
The steps in each sequence are created using snapshots from the Snapshots tab. Make sure to create and save snapshots before building sequences.
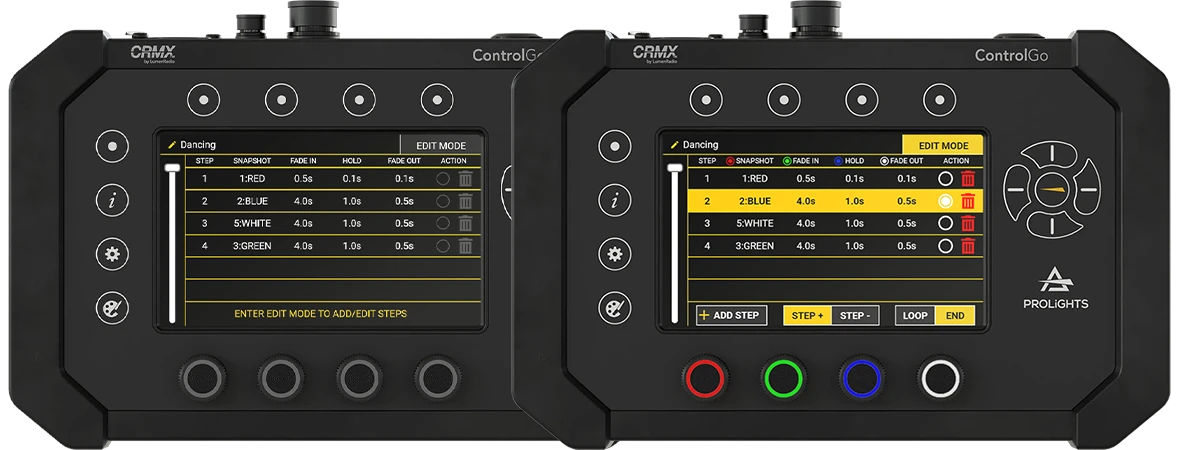
When selecting a sequence and clicking on Button/Encoder 1 (Edit), the sequence view will open, allowing you to see the steps contained within the sequence (if any exist). To modify the sequence, click EDIT MODE in the top right corner of the screen to enter editing mode.
Once in Edit Mode, the screen will update, and circles with colors matching the encoders will appear over the functions. The encoders have the following functions:
- Encoder 1 (Red): Change the snapshot for the selected step (using snapshots from the Snapshots tab). This determine which snapshot will be used during that step in the sequence.
- Encoder 2 (Green): Set the Fade In time for the selected step (in seconds, including decimals). Fade In controls how long it takes for the lighting to transition from its previous state to the selected snapshot.
- Encoder 3 (Yellow): Set the Hold Time for the selected step. Hold Time is the duration that the lighting stays in the selected snapshot's state before moving to the next step. For example, if the hold time is set to 5 seconds, the lighting will remain in that step's configuration for 5 seconds before transitioning.
- Encoder 4 (White): Set the Fade Out time for the selected step. Fade Out controls how long it takes for the lighting to transition from the current step to darkness or to the next snapshot.

To begin editing:
- Click +ADD STEP at the bottom of the screen to add one or more steps.
- Select the steps by clicking on the circle to the right of each row/step.
- Adjust the parameters for each selected step using the encoders.
When finished, click EDIT MODE again to exit editing mode.
Moving Steps
In the Edit Mode, there are additional options at the bottom of the screen:
- STEP+ and STEP-: These buttons allow you to move the selected step up or down in the sequence order. For instance, if you have step 4 selected and press STEP+, step 4 will become step 5, and the original step 5 will move to step 4. This feature helps in rearranging the sequence to achieve the desired lighting transitions.
Loop and End Options
Another important setting when editing a sequence is the LOOP/END option. This setting determines how the sequence behaves when it reaches the final step:
- LOOP: When set to LOOP, the sequence will automatically start again from the beginning after reaching the last step. This is useful for continuous lighting effects, such as creating a police effect with two steps (e.g., alternating red and blue), or for creating atmospheric effects that need to be repeated.
- END: When set to END, the sequence will stop once it reaches the last step. This is ideal for sequences that are meant to play through only once, such as during a specific cue in a performance.
For example, if you are programming a sequence for a dance performance and want the lights to repeat their pattern throughout the dance, you would set the sequence to LOOP. On the other hand, if the lighting sequence is intended to highlight a specific moment and should not repeat, you would set it to END.
Playing a Sequence
To play a sequence, use the on-screen buttons or press the corresponding encoder below each icon, which has the same color as the circle around the icon on the screen. The encoders are colored in the following order: Cyan, Magenta, Yellow, Red. The color of the encoder matches the color of the circle around its corresponding on-screen icon, providing a clear visual reference for quick selection.
Editing and Settings for a Snapshot
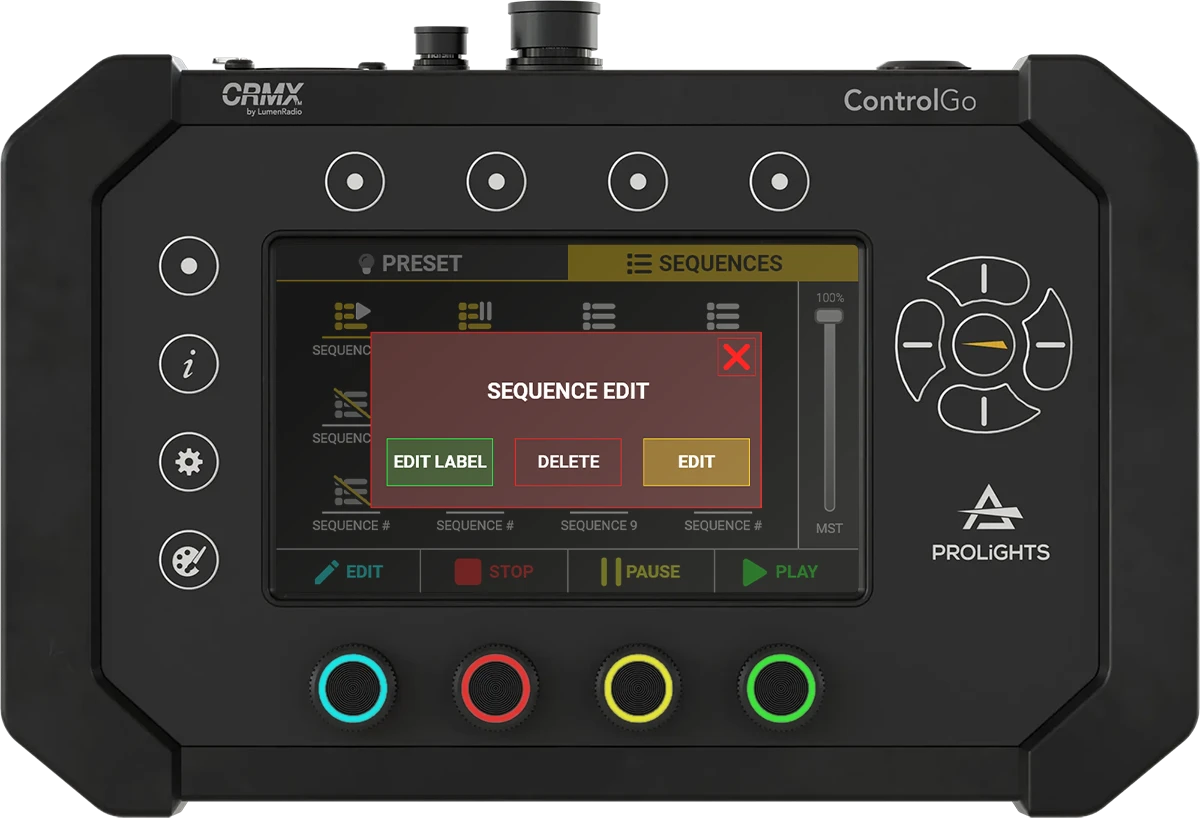
Once a sequence is saved, pressing and holding the slot for 2 seconds will open a popup with the following options:

- [EDIT LABEL]: Modify the name of the sequence. Selecting this option brings up the keyboard for renaming. The name can be edit inside the edit mode too.
- [DELETE]: Permanently remove the sequence from the selected slot.
- [EDIT]: Opens the snapshot in edit mode.
On-Screen Controls
The Sequences screen also includes several on-screen buttons that can be used to control playback:
- EDIT: Opens the sequence for editing.
- STOP: Stops the current sequence.
- PAUSE: Pauses the sequence at the current step.
- PLAY: Plays the sequence from the beginning or resumes playback if paused.
These controls allow for real-time adjustments and quick modifications during live performances, providing lighting technicians with a versatile toolset for managing complex lighting setups.